.png)
.svg)
How to Embed a Video in Webflow?

Key takeaways
- Videos enhance engagement, explain complex ideas, and can improve SEO when optimized properly.
- Webflow makes it easy to embed videos using the Embed element and supports customization like autoplay, loop, and size adjustments.
- Vidzflow, a Webflow-exclusive video app, allows seamless uploads, responsive embeds, and optimized performance without coding.
- Always optimize videos for speed, responsiveness, accessibility, and SEO with captions, high-quality thumbnails, and descriptive titles.
- Avoid autoplay with sound and test videos across multiple devices to ensure a consistent user experience.
- Regularly monitor video performance to maintain fast load times and high engagement.
In this guide, I’ll explore how you can easily add a video to your Webflow project to enhance user engagement and provide a richer online experience.
Benefits of Using Videos in Web Design
Videos are an effective tool in web design for several reasons:
- Improved user engagement — Videos can capture and maintain visitor attention more effectively than text or images alone.
- Enhanced communication — They are excellent for demonstrating products, explaining complex concepts, or telling stories.
- SEO advantage — Properly optimized videos can also boost your website's search engine rankings.
{{cta}}
Adding a Video in Webflow: Step-by-Step Guide
Webflow offers a straightforward process for embedding videos into your website. Here’s how you can do it:
Step 1: Choose Your Video
First, you need to have the video you want to add to your website. This could be a video hosted on several platforms, but I recommend using Vidzflow, as it is a Webflow-exclusive video hosting solution that ensures light and fast videos on Webflow sites.
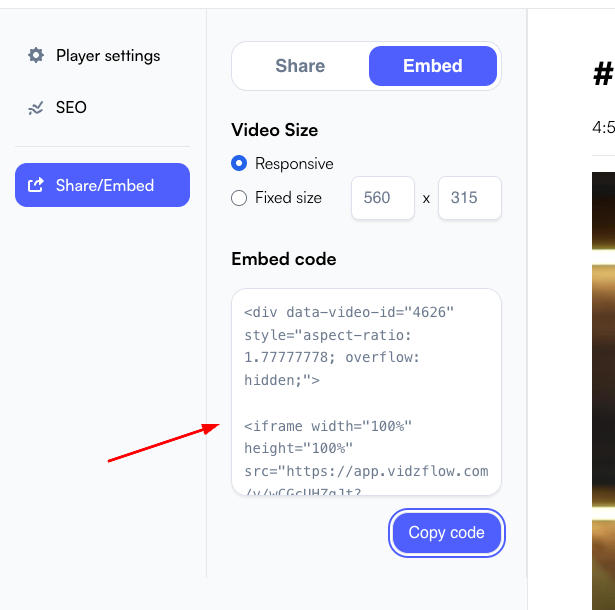
You can either upload your video to Vidzflow or paste a link to an existing video from a number of external sources like YouTube, Vimeo, Wistia, etc. Vidzflow will grab the video, and you can then adjust various settings, customize your player, and even optimize it for SEO.

Next, you need to copy the embed link as shown below. Ideally, you should make it responsive so that it fits different screen sizes.
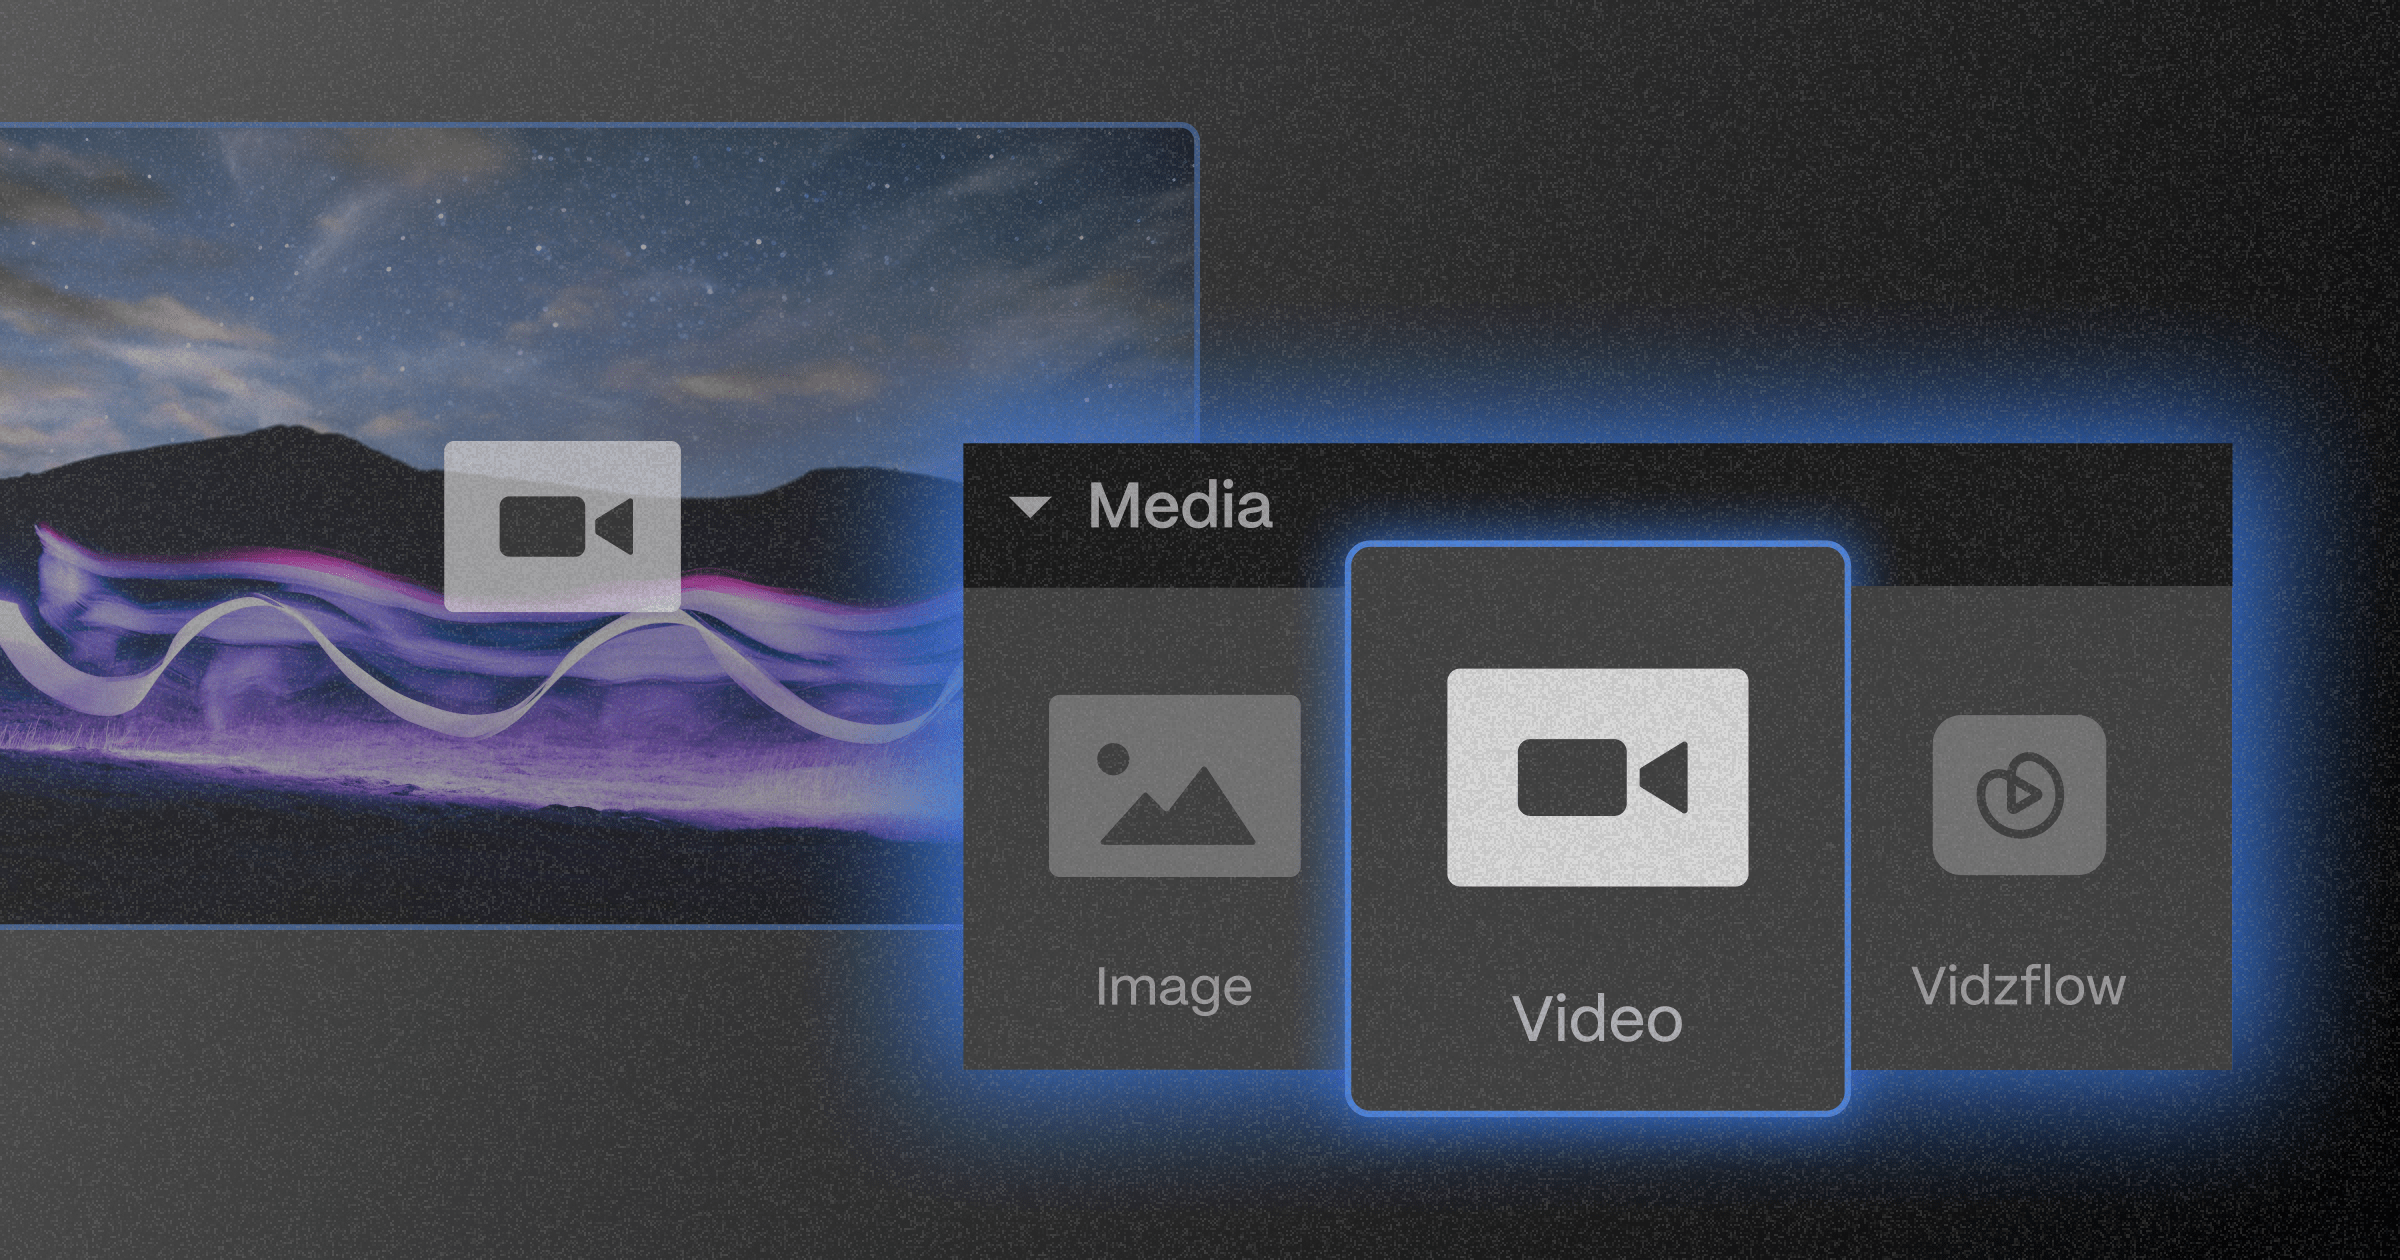
Step 2: Using the Embed Element
- Go to your Webflow Designer.
- In the "Add Elements Panel" (the plus '+' symbol), locate the "Embed" element.
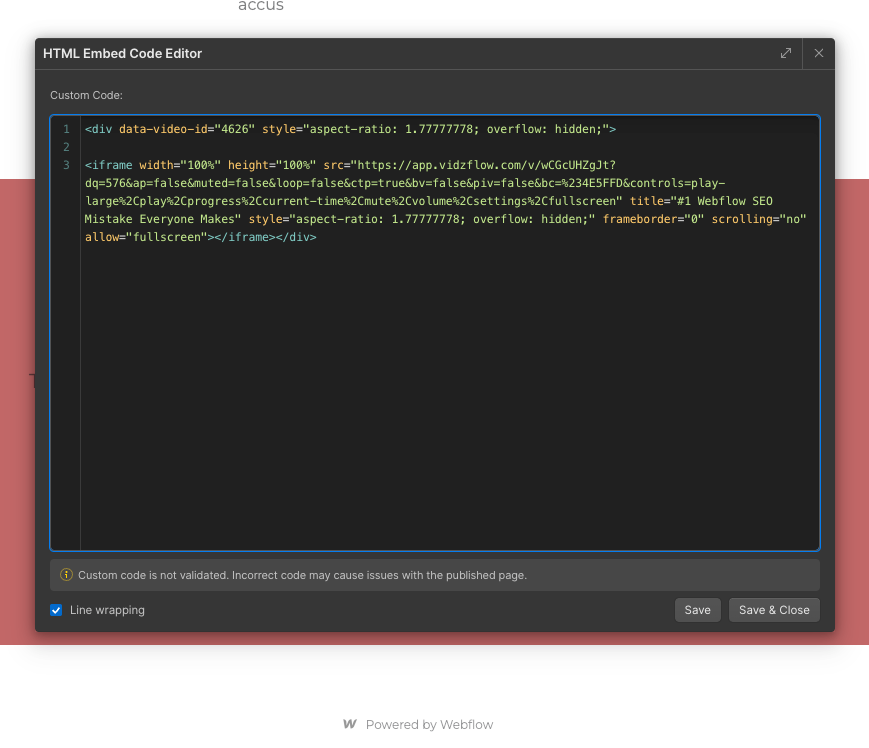
Step 3: Embedding a Video
Once the Embed element is added to the page, you will be prompted to paste the HTML code you copied in Vidzflow.
The video is now added to your page successfully and should be displayed in Webflow Designer.
Step 4: Customizing Your Video
Webflow offers various customization options, such as:
- Setting autoplay, loop, and mute options.
- Adjusting the size and aspect ratio.
Step 5: Publishing Your Site
Once your video is set up:
- Preview your site to ensure the video displays correctly.
- If everything looks good, publish your site.
Embedding Videos to Webflow with No Code Using Vidzflow
Since Vidzflow is a Webflow app, it's also available within Webflow Designer. This further streamlies the process of embedding videos.
First, you need to connect your account to the Webflow Designer app.
- Install Vidzflow on Webflow and access the authentication screen.
- Existing users: Go to your Vidzflow profile, generate an API key in the "API Key" section.
- New users: Register at Vidzflow's registration page, then generate an API key in your profile.
- Copy the API key and use it in the Webflow Designer extension.
Note: Generating a new API key logs you out of active Webflow Designer sessions.
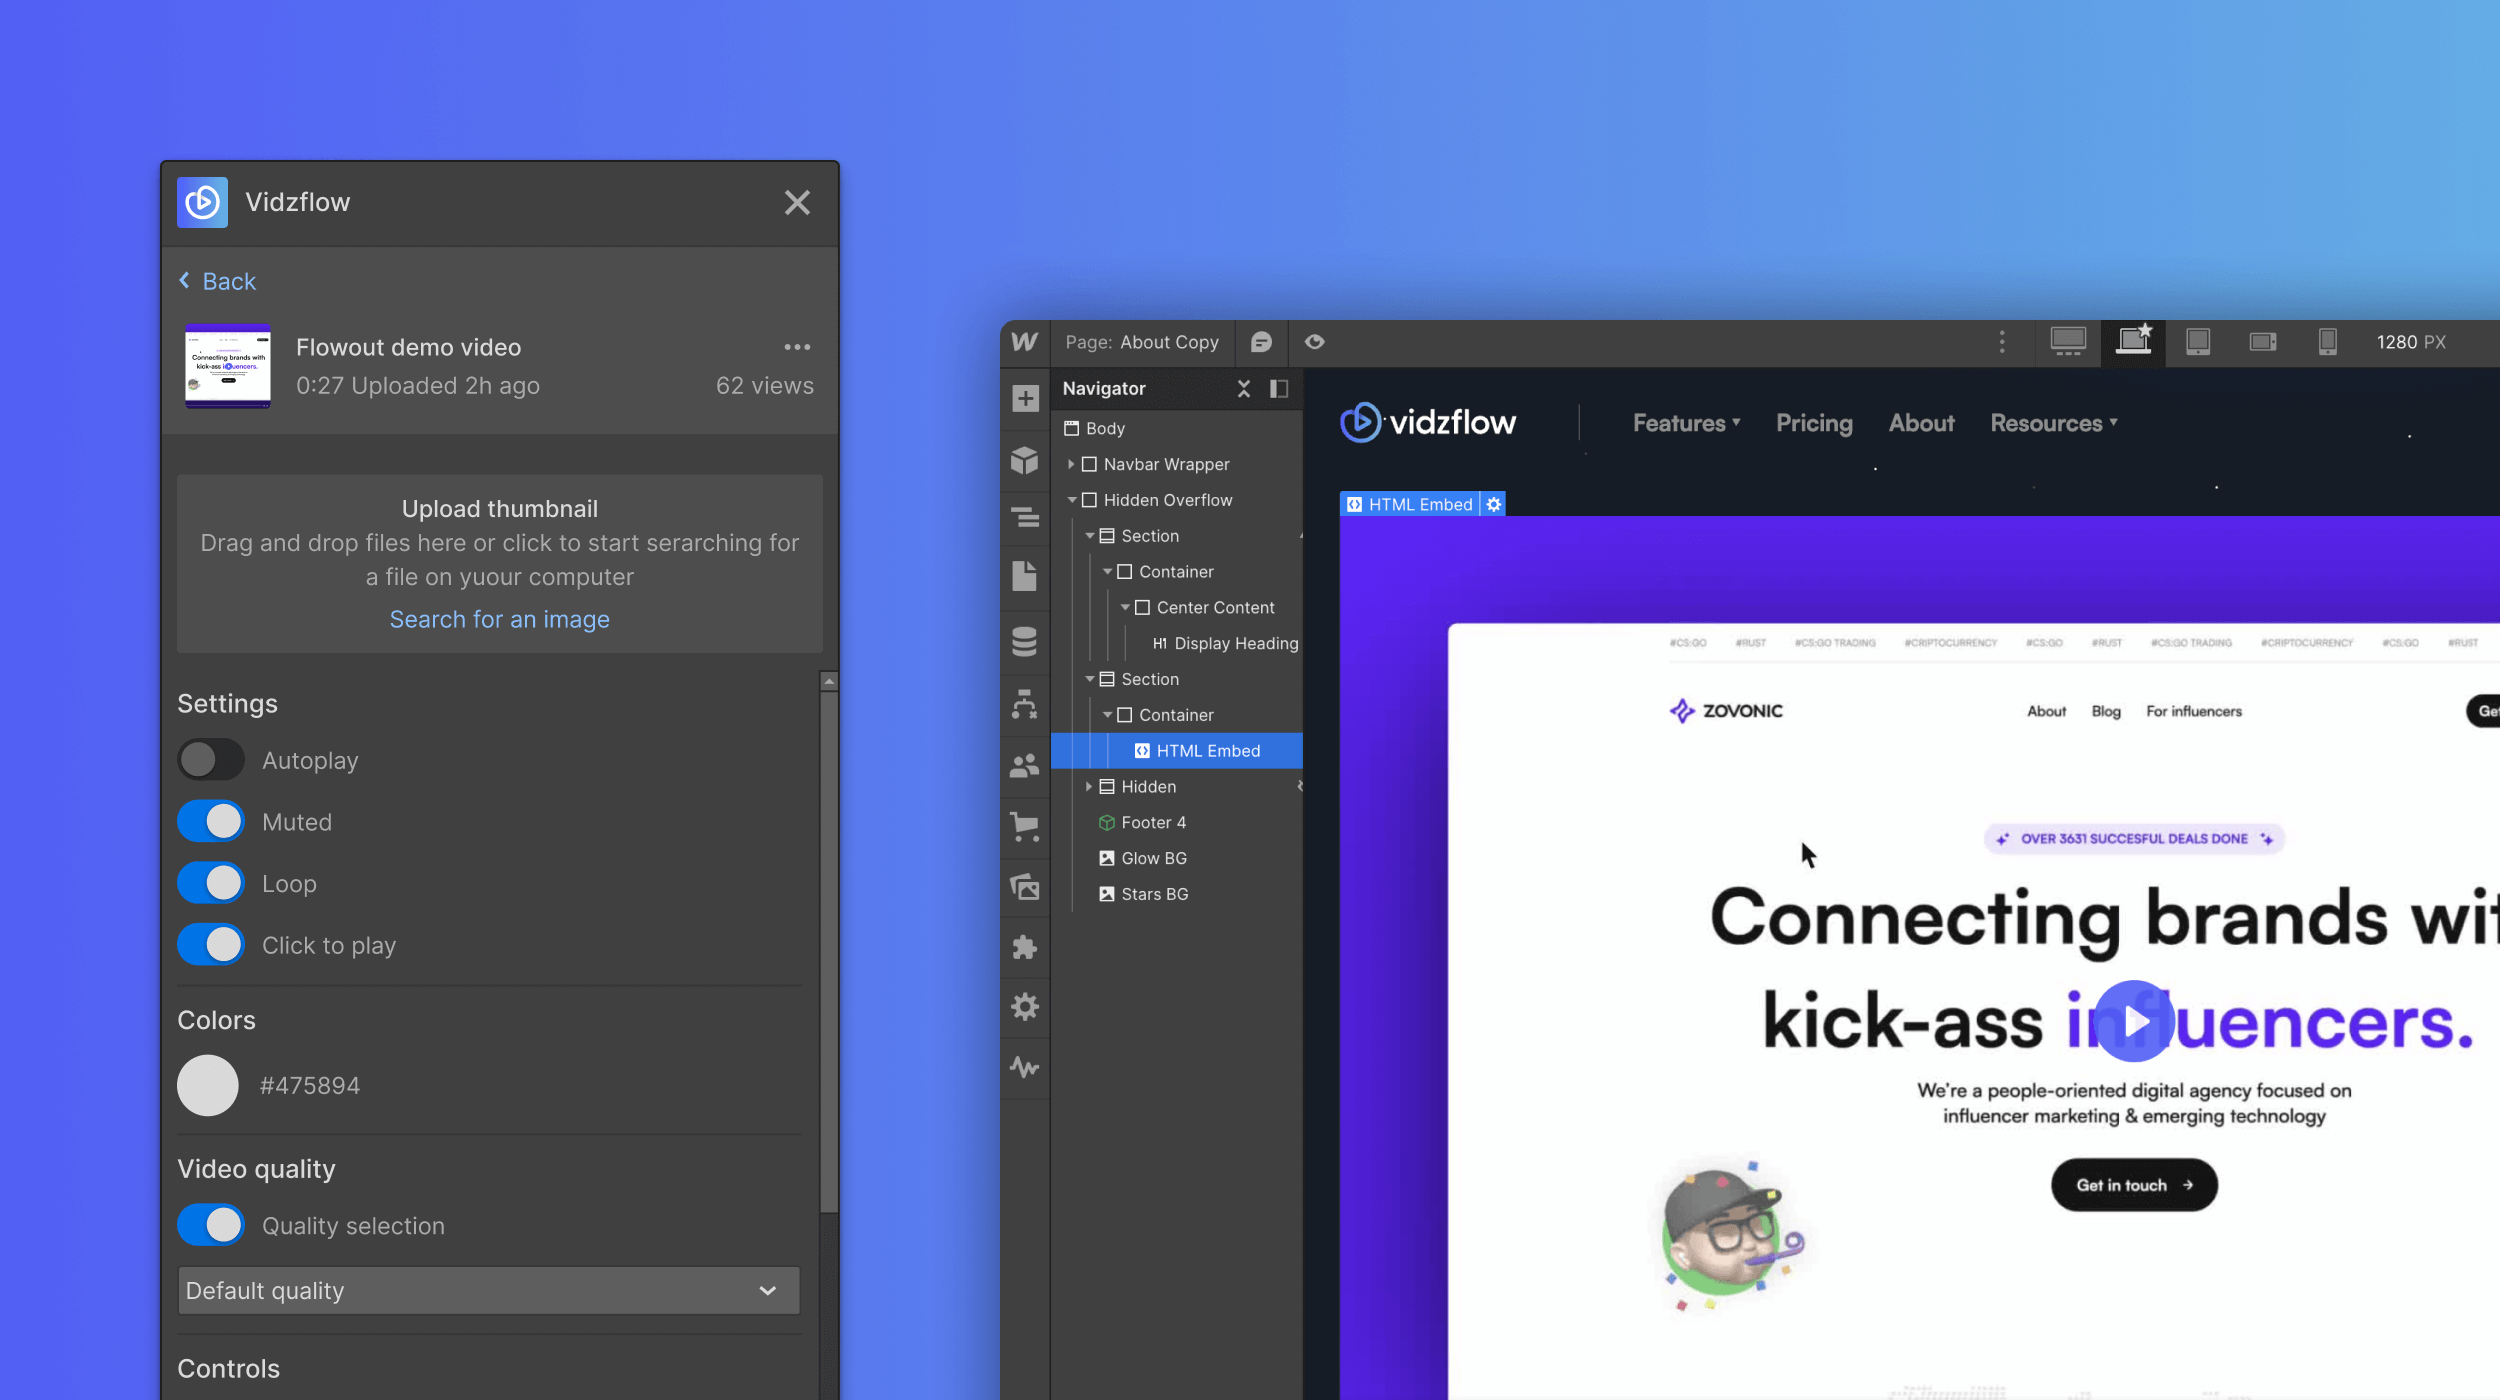
This will lead you to the Vidzflow dashboard, where you can explore different options.
Next, it is time to upload the video:
- Start in the "Upload Videos" section on the dashboard.
- Drag and drop videos or click to select files for upload.
- Watch as the video uploads in real-time.
Once the video is up, you can customize it, upload the video thumbnail, and much more. After it is prepared to be inserted on your page, here's what to do:
- Start by selecting a container element in Webflow Designer for your video embed.. If the chosen element isn't suitable, the Vidzflow extension will notify you.
- In the video page's bottom, adjust the video size in the 'video size section'. Choose "Responsive" for the video to adapt to different screen sizes (height and width set to 100%). For fixed dimensions, select "Fixed" and specify height and width in the provided input fields.
- Click "Embed Video" at the bottom of the video page to finalize embedding.
Alternatively, embed directly from the dashboard. Select an element in Webflow Designer, open the video card's contextual menu (3 dots), and click "Embed Video". This embeds the video responsively.
Best Practices for Video Integration
Here are some things to consider when embedding your video on a Webflow project.
- Optimize for load time — Ensure your video is optimized for web use to prevent slow loading times. Vidzflow can significantly help you with this.
- Responsive design — Test the video on different devices to ensure it scales correctly.
- Captions and subtitles — Always add subtitles to video content. This not only aids those with hearing impairments but also benefits users who watch videos without sound.
- Flexible layout — Make sure your video player is responsive and adjusts to various screen sizes and orientations. Use relative units like percentages for width and height.
- Test on multiple devices — Check how your video appears on different devices - smartphones, tablets, and desktops - to ensure a consistent experience.
- SEO optimization — Use descriptive titles and meta descriptions for your videos.
- Thumbnail quality — Use high-quality, engaging thumbnails for your videos. Thumbnails act as the first impression and can influence click-through rates.
- Avoid autoplay with sound — Autoplaying videos with sound can be intrusive and negatively impact the user experience. If you use autoplay, start with the sound off.
- Monitor performance — Regularly check your video's performance metrics, like load time and engagement rates, and make adjustments as needed.
Conclusion
Adding a video to your Webflow site is a simple yet effective way to enhance your website's appeal. By following these steps, you can create a more engaging and informative online presence.
Remember, the key to a successful integration of video content lies in choosing the right video, optimizing it for web use, and ensuring it aligns with your overall design and communication strategy.
{{cta}}
FAQ for How to Embed Videos in Webflow
What video file formats are supported when embedding videos into Webflow using Vidzflow?
Vidzflow supports commonly used video formats like MP4, WebM, and Ogg. MP4 is the most universally compatible option, ensuring smooth playback across various browsers and devices when embedding into Webflow sites.
How does embedding videos with Vidzflow compare with using standard YouTube or Vimeo embeds?
Vidzflow offers faster loading, better performance, and improved design customization compared to standard YouTube or Vimeo embeds, which often come with branding, ads, and limited layout control.
Can I track viewer analytics or performance of embedded videos in Webflow?
If you're using Vidzflow, you can access analytics like views, play rate, and engagement directly in the dashboard. Other platforms like Vimeo Pro or Wistia also offer similar performance tracking features.
Are there SEO benefits to embedding self-hosted videos in Webflow?
Embedding self-hosted or Vidzflow-hosted videos allows for custom metadata, schema markup, and keyword-rich titles, enhancing SEO more effectively than third-party player embeds with limited control.
What are the best practices for video thumbnail optimization in Webflow?
Use high-resolution JPEG or PNG images with a 16:9 aspect ratio, under 150 KB file size. Thumbnails should visually represent the content and include compelling visuals or text overlays to boost clicks.
How do I handle video autoplay settings across different browsers in Webflow?
For autoplay to work reliably, browsers often require the video to be muted. Always enable muted autoplay for cross-browser compatibility and test behavior in Chrome, Firefox, Safari, and mobile browsers.


_(1).png)
.png)


.svg)

.png)
.png)
.webp)
.svg)

