.svg)
How to Set Up the Figma to Webflow Plugin
Key takeaways
- The Figma to Webflow plugin turns static Figma designs into Webflow-ready HTML/CSS to speed up builds.
- The newer Figma to Webflow App adds real syncing so design updates in Figma flow directly into Webflow.
- Setup is simple: install the plugin, connect your workspace, run it in Figma, and sync components through the Webflow App.
- Keep edits in Figma to avoid sync issues, and use auto layout, clear naming, components, and organized variables.
- Resolve sync conflicts by deleting the missing element in Webflow, importing an unsynced version, or reverting changes in Figma.
- The plugin supports responsive layouts, typography, gradients, vectors, and more to streamline Webflow development.
The website-building process for many Webflow experts starts with creating a site design in Figma.
However, Figma designs are static, and getting a dynamic prototype means copying everything from the popular web app for interface design to Webflow.
Luckily, the Figma to Webflow plugin streamlined this process.
In the following guide, we’ll help you set up the plugin and help you get started.
{{cta}}
What Is Figma to Webflow Plugin and How Does It Work?
Developed by Webflow Labs, the Figma to Webflow Plugin helps you turn your Figma designs into Webflow CSS and HTML.
In other words, you can easily copy your designs from Figma and add them to your Webflow projects in the form of responsive flexbox structures. Once your design is ready in Webflow, you can start adding content to it with Webflow’s robust CMS and launch the site once it’s ready.
The plugin supports typography, border, and shadow styles, auto layout, absolute position, images, opacity, linear gradients and background images, and shape and vector SVG conversion.
Moreover, it has various other features, such as more than 20 prebuilt layouts and other responsive structures, automatic creation of your style guide, support for vector nodes export s SVGs, 50+ CSS declarations support, and more.
Of course, after your design is added to Webflow, there’s still plenty of work to do to make a fully functional and impactful website. In other words, Figma to Webflow can speed up some processes, but don’t think of it as a one-click website transformation tool that will automatically build your Webflow site from your Figma designs.

Setting Up the Figma to Webflow Plugin
Setting up the Figma to Webflow plugin isn’t a difficult process. However, take into account that this is just the first step towards leveraging its full potential.
Here’s a step-by-step installation guide.
- Open a Figma account — Since you’re on this page, the chances are you already use Figma as your primary tool for design and collaboration. Therefore, we’ll assume that you have an account. In case you don’t, please register at figma.com.
- Go to the official Figma to Webflow plugin page — In the upper right corner, you’ll see a blue Try it out button. Click on it to begin setting it up.
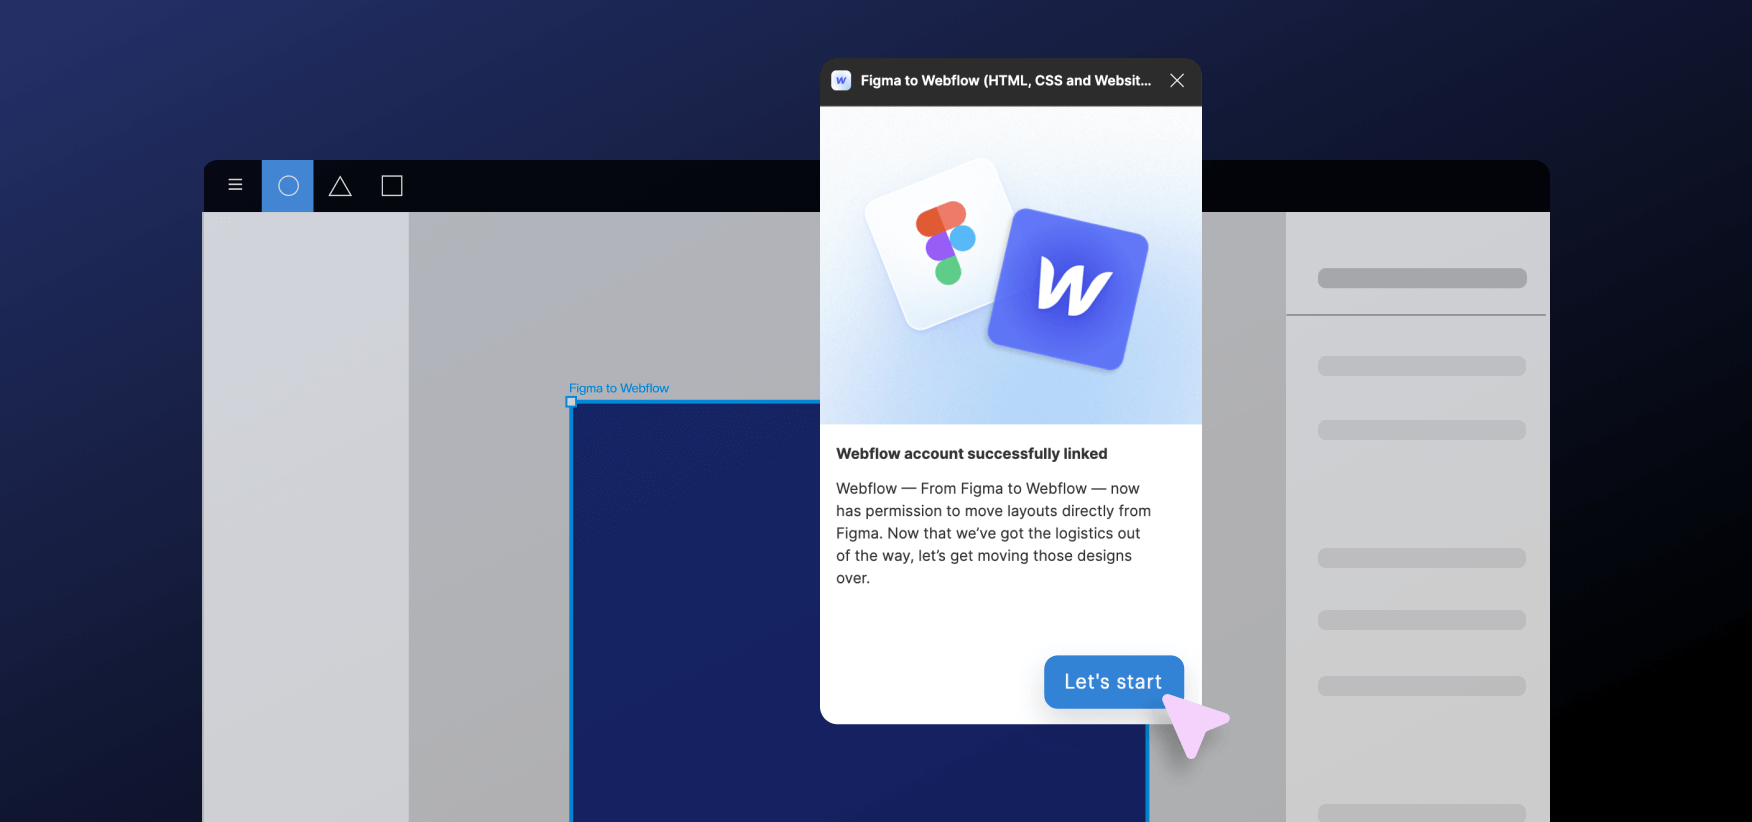
- Click on Run — After clicking on Try it out, a new Figma design file will open up, and you’ll have to select the option Run. This will request authorization from your Webflow account.
- Select which sites you want to authorize — Check which of your Webflow projects will authorize the Figma to Webflow plugin (in case you have many projects). Of course, you can do it for your entire Webflow workspace. Click on Authorize app when you finish deciding on this.
- Open the Figma to Webflow plugin in Figma — If the fails to open automatically in your Figma app, click on Resources -> Plugins tab -> Click Run on Figma to Webflow plugin.
That’s it! You’ve successfully installed the plugin, and it’s ready to use.
Update: Introducing the Figma to Webflow App
In 2024, Webflow launched the Figma to Webflow App, part of the Webflow app ecosystem. The main difference between the app and the plugin is that the app actually allows you to sync the changes you make in Figma with your Webflow projects, whereas the plugin only allows you to copy the Figma design to Webflow without synchronization.
If you already installed the Figma to Webflow plugin, the app should be in your Apps section in Designer. If not, here’s the process described.
1. Install the Figma Plugin
- Go to Resources > Plugins in Figma.
- Search for "Figma to Webflow" and install the plugin.
2. Connect to Webflow:
- In Figma, open the Figma to Webflow plugin.
- Choose to connect your entire Webflow workspace or specific sites.
- Authenticate the connection using your Webflow account.
3. Select a Project in Figma
- Go to Figma and select the Design System Sync tab.
- In the dropdown, pick the Webflow one of the sites you authenticated in the previous step.
4. Sync the Webflow App
- Go to your Webflow site.
- Open the Apps panel in the Webflow Designer in the project you selected.
- The Figma to Webflow App should be listed there. Launch the App.
- After both apps are open, they will connect and be in sync.
In other words, once you launch the App, it will automatically connect to the Figma plugin if both are configured correctly. This creates a connection between Figma and Webflow, allowing you to sync your designs.
How to Add New Figma Components
Now that Figma and Webflow projects are in sync, it is time to add your Figma designs.
- Use the select mode to select all components in Figma that you want to add.
- Use the Plugin to sync them. It will recognize all components and variables.
- Use the Webflow app to import the components and variables from Figma. You can then start to add them to your site.
How to Sync Design Changes in Figma
Syncing is super-easy when the plugin and the app are working together.
- Make the changes to the designs you want.
- Use the plugin to sync them with your Webflow project.
- In Webflow Designer, review the imported changes and approve them.
That’s it! Your components and variables will be updated and ready to use.
Resolving the Conflict in Figma to Webflow App
If you delete an element from a component in Figma and then sync with Webflow, the Figma to Webflow app will report a conflict. In that case, there are three solutions:
- Delete missing element in Webflow component: This removes the missing element from all instances of the component in your Webflow project.
- Import as unsynced component: This creates a new, separate component in Webflow that doesn't sync with the Figma component anymore. Any future changes in Figma won't affect this unsynced component.
- Revert changes in Figma: This is the most conservative option. You can go back to Figma, undo the deletion of the element, and then resync the component.
Tips for Using the Figma to Webflow App
To maximize the sync between Figma and Webflow, make sure to:
- Don’t make changes in Webflow — Since it’s Figma to Webflow app and plugin, it’s important to know that the imported designs from Figma need to be edited in Figma and then synced with Webflow. If you change them in Webflow, the sync will break, and new components will be created when you sync with the app.
- Use the auto layout for all Figma designs — This allows your Figma designs to be converted to CSS in Webflow easily.
- Create and organize your variables in Figma — Once you sync the Figma design with your Webflow project, the variables will be applied in Webflow.
- Create components in Figma — For design sync to work, turn your designs into components, which will immediately become classes in Webflow.
- Name everything properly — Name your layers and elements properly as they will, too, be used in Webflow.
Figma to Webflow Plugin: The Benefits
Here are some of the main benefits of using the Figma to Webflow plugin.
- Seamless design transfer — You can easily transfer your designs created in Figma to Webflow without having to manually recreate each element, saving time and effort.
- Automatic translation — The plugin converts Figma layers into HTML and CSS, making it easier to generate the code for your Webflow site based on your Figma designs.
- Supported design elements — The plugin supports a variety of design elements, including auto layout, typography styles, border styles, shadow styles, background images and gradients, vector and shape conversions to SVGs, images, opacity, and absolute positioning.
- Responsive design — You can control the responsiveness of your Figma designs when transferring them to Webflow, allowing you to specify breakpoints at which elements shift to vertical stacking.
- Copy and paste styles — You can copy text and color styles from Figma to Webflow, making it simple to maintain consistent design styles across your site.
- Efficient workflows — The plugin streamlines the design-to-development process, helping designers create the initial designs in Figma and use them as a guideline for building the site in Webflow.
- Support and community — While the plugin is experimental and may change over time, you can find support and resources in the Webflow Labs Community, where the Webflow community and staff can help with questions and feedback.
- Custom HTML tag definition — You can manually define HTML tags for Figma layers to ensure proper rendering when transferred to Webflow.
- Removal and troubleshooting — The plugin can be easily removed from your Workspace or specific sites, and troubleshooting guidance is available in case you encounter issues.
- Constant Improvement — Webflow Labs continuously improves the plugin to enhance its functionality and usability.
Figma to Webflow Plugin: A Free Tutorial by Webflow
Webflow University covered all you need to know about Figma to Webflow plugin, which I recommend checking out if you're interested in learning how to seamlessly transfer your designs to WF.
FAQ for Figma to Webflow Plugin
How does the Figma to Webflow App differ from other design handoff tools like Zeplin or Avocode?
The Figma to Webflow App enables direct synchronization and live syncing between design and development, while tools like Zeplin or Avocode only provide static design specs and assets without auto-generating Webflow-ready code or layouts.
What are best practices for structuring Figma files to optimize Figma to Webflow sync?
Use auto layout extensively, organize components and variables clearly, name all layers descriptively, and avoid arbitrary grouping. Proper setup ensures cleaner code generation and better consistency during sync with Webflow.
Can the Figma to Webflow plugin handle advanced interactions or animations from Figma?
The plugin does not import interactions or animations from Figma. These need to be recreated manually within Webflow using its built-in interactions and animation tools after syncing the design components.
Is it possible to revert synced changes after importing from Figma to Webflow?
Yes, if a conflict occurs or a change needs reverting, you can either undo the edit in Figma and resync, delete the updated Webflow component, or import as a new unsynced component to preserve the original.
What should developers avoid doing in Webflow after syncing designs from Figma?
Avoid editing synced components directly in Webflow, as it breaks the sync. All structural changes should be made in Figma, then re-synced to reflect updates properly without creating duplicates.
How do Webflow classes relate to Figma components during the sync process?
When a Figma component is synced with Webflow, it automatically generates a corresponding Webflow class. Any modifications to the Figma component can update its linked Webflow class upon resync.
Can the Figma to Webflow integration be used collaboratively by multiple team members?
Yes, team members with Figma and Webflow access can collaborate by sharing design files and syncing them to shared Webflow projects, provided each collaborator has appropriate workspace permissions.

Mihajlo Ivanovic
Mihajlo is the one who replaces Lorem Ipsum texts with the actual copy - an SEO and content expert at Flow Ninja. He has 10+ years of experience as a content writer for various industries. He also plays bass occasionally.


.svg)

.png)
.png)
.webp)
.svg)

