.svg)
How to Set up Conversion Tracking in Google Analytics with Webflow
Key takeaways
- Google Analytics (GA4) is the standard for website tracking, and it can be fully integrated with Webflow to monitor traffic and user behavior.
- GA4 replaces Universal Analytics, so Webflow users still on UA must migrate and set up new tracking properties.
- To add GA4 to Webflow, you need to create a GA account, set up a GA4 property, add a web data stream, and copy your Measurement ID.
- The Measurement ID (starting with “G-” or “AW-”) is pasted into Webflow’s Integrations tab to activate tracking.
- GA4 uses event-based tracking, offering more flexibility and deeper insight than UA, especially for conversions.
- Once set up, GA empowers you to measure performance, optimize UX, improve funnels, and build better-converting Webflow sites.
Google Analytics is the most powerful tool for tracking your site’s analytics.
According to BusinessDIT’s take on GA stats, around 28.1 million websites use this tool, which is 55.49% of all sites on the web.
It’s continuously updated, with new and robust features added now and then. Moreover, GA can be added to any site, meaning even Webflow sites can be connected.
If your site is created on Webflow, the guide below will help you understand how to set up conversion tracking in Google Analytics.
Let’s take a look.
{{cta}}
What Is Google Analytics?
Google Analytics (often referred to as just GA) is a free tool by Google that helps you collect data about the traffic on your website. You can see where your visitors come from, what pages they’re visiting, how long they’re staying on your website, and more.
Google published detailed guides on using the tool. These are regularly updated whenever the team behind GA makes changes or adds new features.
The GA4 Update
Google Analytics 4 is a stand-alone property that is already up and running. The older version of this is referred to as Universal Analytics (UA), and it stopped operating on July 1, 2023.
It’s a next-gen tool for collecting event-based data and is built to be more powerful and robust compared to Universal Analytics.
Why is this important?
The process of collecting data and setting up the metrics you want to track is different, meaning you should be familiar with how GA4 works.
Adding Google Analytics to Your Webflow Site — Where to Start?
Webflow features the Google Analytics integration option. Depending on your current status with GA, there are three possible scenarios here.
- You’ve never set up GA via Webflow’s GA integration feature — In this case, you’ll need to follow the steps to add the GA integration to your Webflow website.
- You have Universal Analytics set up but haven't used the GA integration on Webflow — You need to migrate to GA4 first to be able to add analytics to your Webflow site. I am not going to explain this in the article, as Google has already published detailed guidelines on adding a Google Analytics 4 property to a website with already established UA.
- You already have Universal Analytics set up via Webflow’s Google Analytics integration — You’ll still have to migrate to GA4, but the process will be somewhat different.
I will cover the first and third cases below.
{{cta}}
Adding Google Analytics Integration to Your Webflow Site
If you’re not tech-savvy, I recommend asking someone more experienced to do this for you. The process itself isn’t difficult, but it requires following each step carefully.
Once again, this is something covered in detail by Google’s professionals. I suggest reading this guide, where you’ll learn how to create an account, create a GA4 property, and add a data stream.
Here’s my take on this.
Opening a GA Account
- Find the Create Account button in the Admin section (Account column). See the pictures below.

- Next, you’ll need to provide a name for your account. Moreover, you’ll need to set your data-sharing configurations to let Google know which data from your site you intend to share.
- Create an account. It’s now time to add your initial property to the account.
Adding a Property to Your Google Analytics Account
- Go to the Admin settings, and next to your Create Account option, you’ll see Create Property. You can only do this if you have the Editor role for your analytics.

- Enter the property name, and select time zone, currency, and other preferences. Click Next.
- Select your business size and industry category.
- Set up how you want to use GA.
- Click Create and accept the ToS, as well as the Data Processing Amendment.
Now that you’re done with this step, you need to add a data stream.
Adding a Data Steam
- In the Admin section, make sure you have the correct account and property selected.

- Click on the Property column and select Data Steam.
- Click on Add stream.
Google Analytics 4 can get data from Android apps, iOS apps, and websites. Since Webflow only focuses on building web experiences, you’ll have to proceed with the Web option. Here’s what to do next.
- Add your site’s URL and the Stream name.
- Decide whether to enable or disable enhanced measurement.
- Select the Create stream option.
At this point, you’ve completed the setup process. Next, you need a measurement ID to incorporate in your CMS (Webflow, in this case).
Getting the Measurement ID
- Go to Google Analytics and open the Admin section. Make sure the correct property and account are selected.
- Go to Property and click on Data streams.
- Select the previously set up Data stream.
- Find the Google tag section and select the option to configure tag settings.
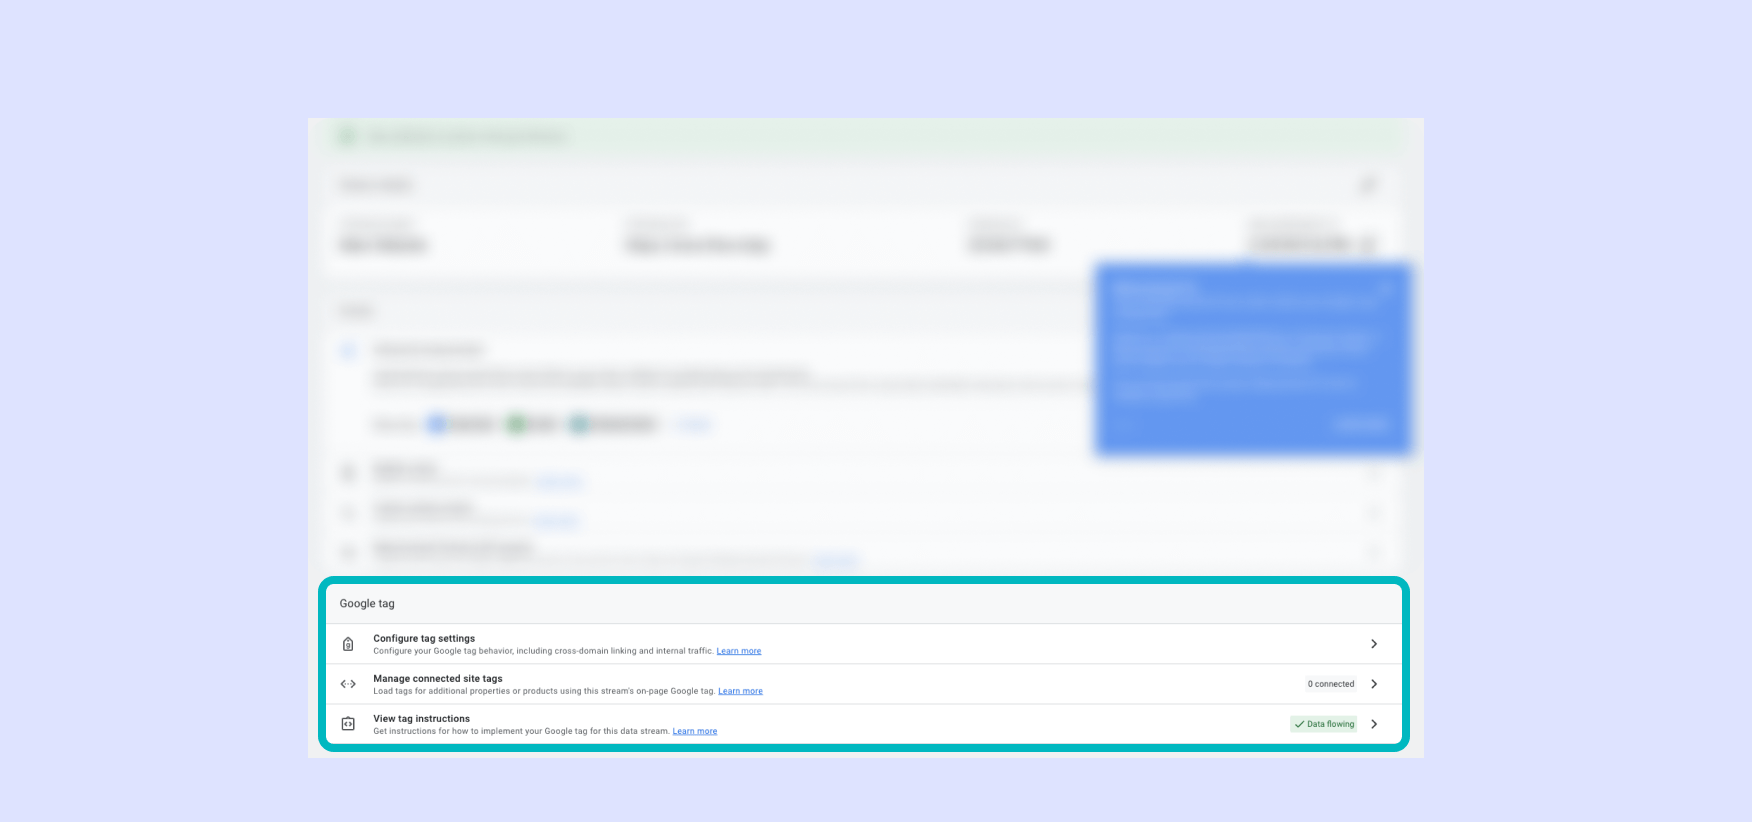
- You’ll see your Google tag or measurement ID. It usually starts with “G-” or “AW-”. That’s the piece of code you need to enter to the dedicated Webflow section.
Adding Measurement ID to Webflow
Finally, we’re here. Load your Webflow account. Here’s what you need to do.
- Find the Site setting options in Webflow Designer, open the Integrations tab, and select Google Analytics.
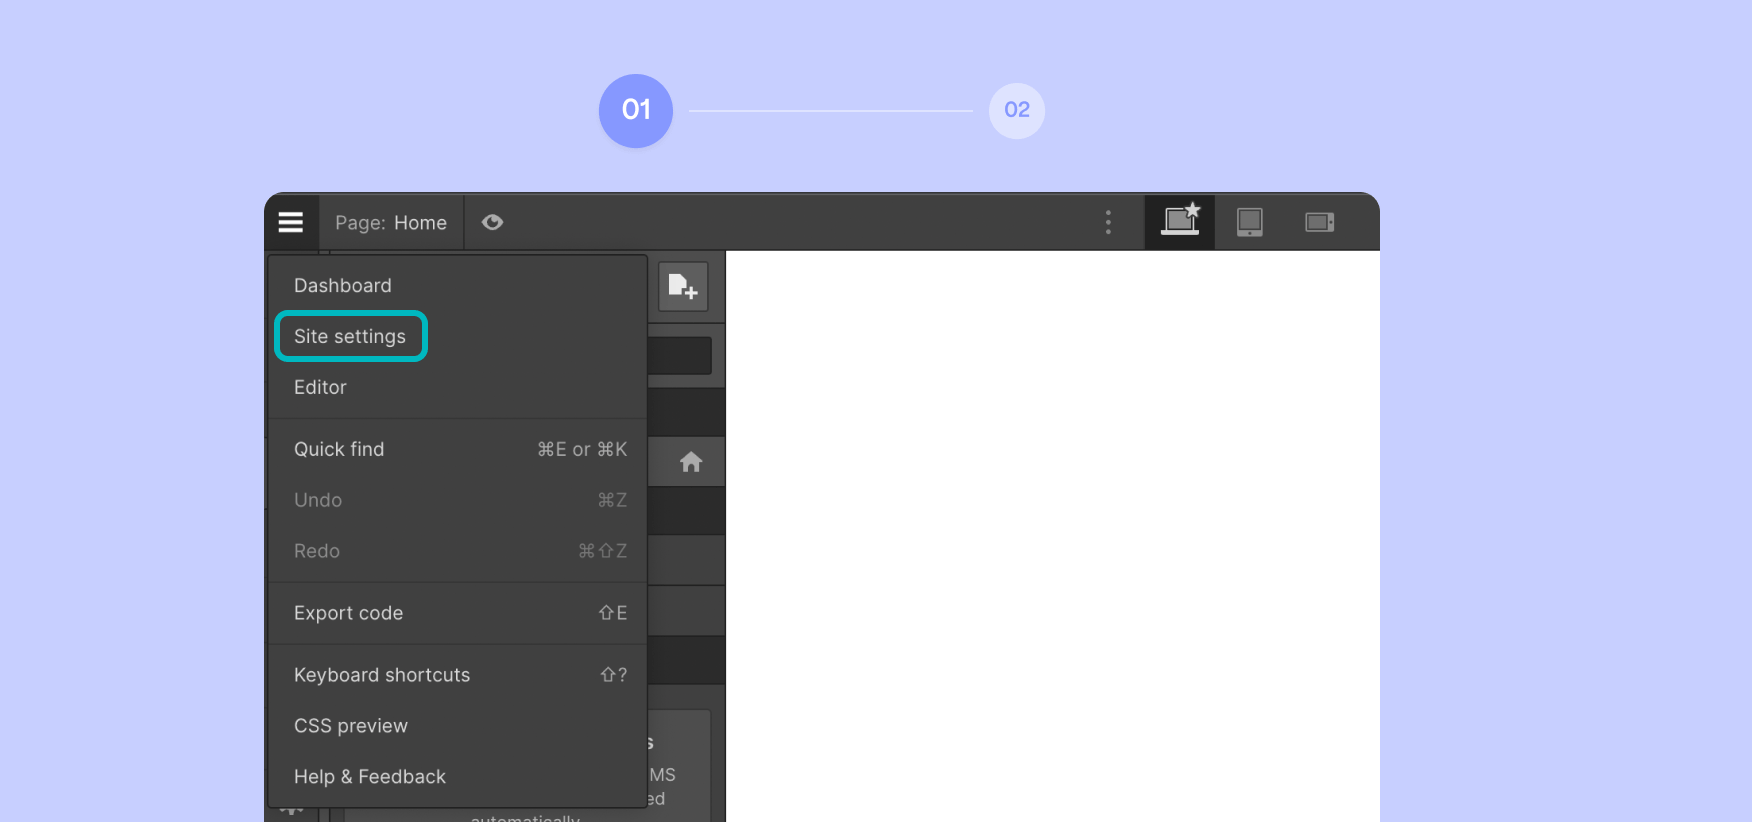
- Paste your Google tag (which is also referred to as measurement ID) in your Measurement ID field.
- Save changes and publish your site.
Voila! You’ve successfully connected GA to your Webflow site.
This is just a start. You can track many things via GA, including your products and services, provided you have an e-commerce site. Google published a guide on how to enable e-commerce tracking.
Migrating from Universal Analytics to GA4
Universal Analytics will cease to exist on July 1, 2023, and that’s why it’s important to migrate to GA4, even if you already have established analytics and added it to Webflow.
To learn if you’re using UA, go to Site settings, and find your Measurement ID under the Integrations tag. If it starts with “UA-,” you’re using Universal Analytics, and that should change.
Here’s what you should do.
- Reach the GA4 Setup assistant and follow the steps provided on this Google’s support page.
- Use the same guide to set up your GA4 property.
- Add a web data stream to your GA4 property, as explained in the Adding a Data Steam section above.
- Configure the measurement code, as explained here. You will essentially receive a new ID that starts with “G-” or “AW-”.
- Copy the measurement ID and add it to the Measurement ID field in your Site settings in Webflow, as explained in the Adding Measurement ID to Webflow section above.
Final Thoughts
So far, I’ve covered the basics, but things do get a bit more complex, especially once e-commerce enters the picture. I recommend reading Webflow University’s take on setting up Google Analytics. I used that piece as my primary source of information, along with available Google support pages.
Setting up analytics isn’t a simple process, but it’s definitely a rewarding one. Once you start understanding how your visitors operate and think, you can further optimize your site, funnel, and everything else needed to make your business or organization more successful.
If you’re looking for someone to design, build, and launch your site, while connecting it to Google Analytics, make sure to get in touch with our Webflow experts.
{{cta}}
FAQ for Conversion Tracking in Google Analytics
How can I verify that Google Analytics is properly tracking data on my Webflow site?
After publishing your Webflow site with GA4 integrated, use the Realtime report in your Google Analytics dashboard to see active users. Alternatively, use Google's Tag Assistant to verify proper tag installation and tracking functionality.
What are the key differences between Google Analytics 4 and Universal Analytics?
GA4 uses an event-based model instead of the session-based model in Universal Analytics. It offers improved cross-device tracking, built-in machine learning insights, and better integration with Google Ads and BigQuery compared to its predecessor.
Can I track specific form submissions on Webflow using Google Analytics 4?
Yes, form submissions can be tracked in GA4 by creating event tags using Google Tag Manager integrated with Webflow. You must configure triggers to fire when forms are submitted and map them as events in GA4.
Is it possible to connect Google Analytics 4 with other tools for better reporting?
GA4 can be integrated with platforms like Google Data Studio, BigQuery, and Google Ads to enhance data visualization, storage capabilities, and advertising performance tracking across campaigns.
How often does Google Analytics 4 update data and reports?
Standard GA4 data updates within 24 to 48 hours, while Realtime reports show user activity moments after it occurs. Some metrics may experience a slight delay depending on traffic volume and complexity.
What permissions are needed to add or modify Google Analytics settings in Webflow?
To edit Google Analytics settings in Webflow, you must have admin or editor privileges for the site’s Webflow project. In GA4, you need Editor access to set properties, create streams, or manage user permissions.
Do I need to use Google Tag Manager with GA4 for Webflow integrations?
Google Tag Manager is not required but offers more control for advanced configurations like event tracking, cross-domain tracking, and conversion actions. For basic GA4 setups, direct integration in Webflow via the Measurement ID is sufficient.

Nemanja Vasilevski
Nemanja is a Webflow Team Lead at Flow Ninja. Before becoming part of the theam, he worked as a professional car mechanic, cars being his primary passion.


.png)


.svg)

.png)
.png)
.webp)
.svg)

