
.svg)
Webflow Localization Features: All You Need to Know
Key takeaways
- Webflow introduced Localization in 2023 and has since built it into a robust tool for managing multilingual and multi-regional websites.
- Users can add multiple locales to tailor content, design, and SEO, with inheritance from the primary locale and overrides for each secondary one.
- Features include localized CMS, static pages, assets, styles, and SEO, along with visitor routing, localized URLs, and support for right-to-left languages.
- Pricing starts at $9 per locale/month for the Essential plan, with Advanced and Enterprise tiers offering more locales, asset localization, and deeper customization.
- Localization improves user experience, cultural relevance, and SEO, helping businesses expand globally.
On October 5, 2023, Webflow held a conference (Webflow Conf) where many new features were introduced, localization being one of them.
Similar to other localization services, Webflow localization offers end-to-end solutions for customizing websites for a worldwide audience, from design to translation to SEO.
In this article, I’ll discuss what it is, how it works, and how to use it in Webflow Designer to get optimal results.
{{cta}}
What is Localization?
Website localization is the process of adapting a website to make it more suitable and appealing for a specific target market or audience, usually based on their geographical location, language, and cultural preferences.
For example, McDonald's website localization is evident in different countries. The French site (mcdonalds.fr) uses the French language, and the Indian site offers a beef-free, vegetarian-friendly menu, aligning with local dietary habits.
The site designs and promotions also vary to reflect regional cultural nuances and comply with local laws, ensuring a tailored experience for customers in each market.
Of course, McDonald’s is an extreme example, and websites sometimes just want to change some aspects of their pages to make them more appealing to local customers and make websites more relevant.
How Webflow Localization Works
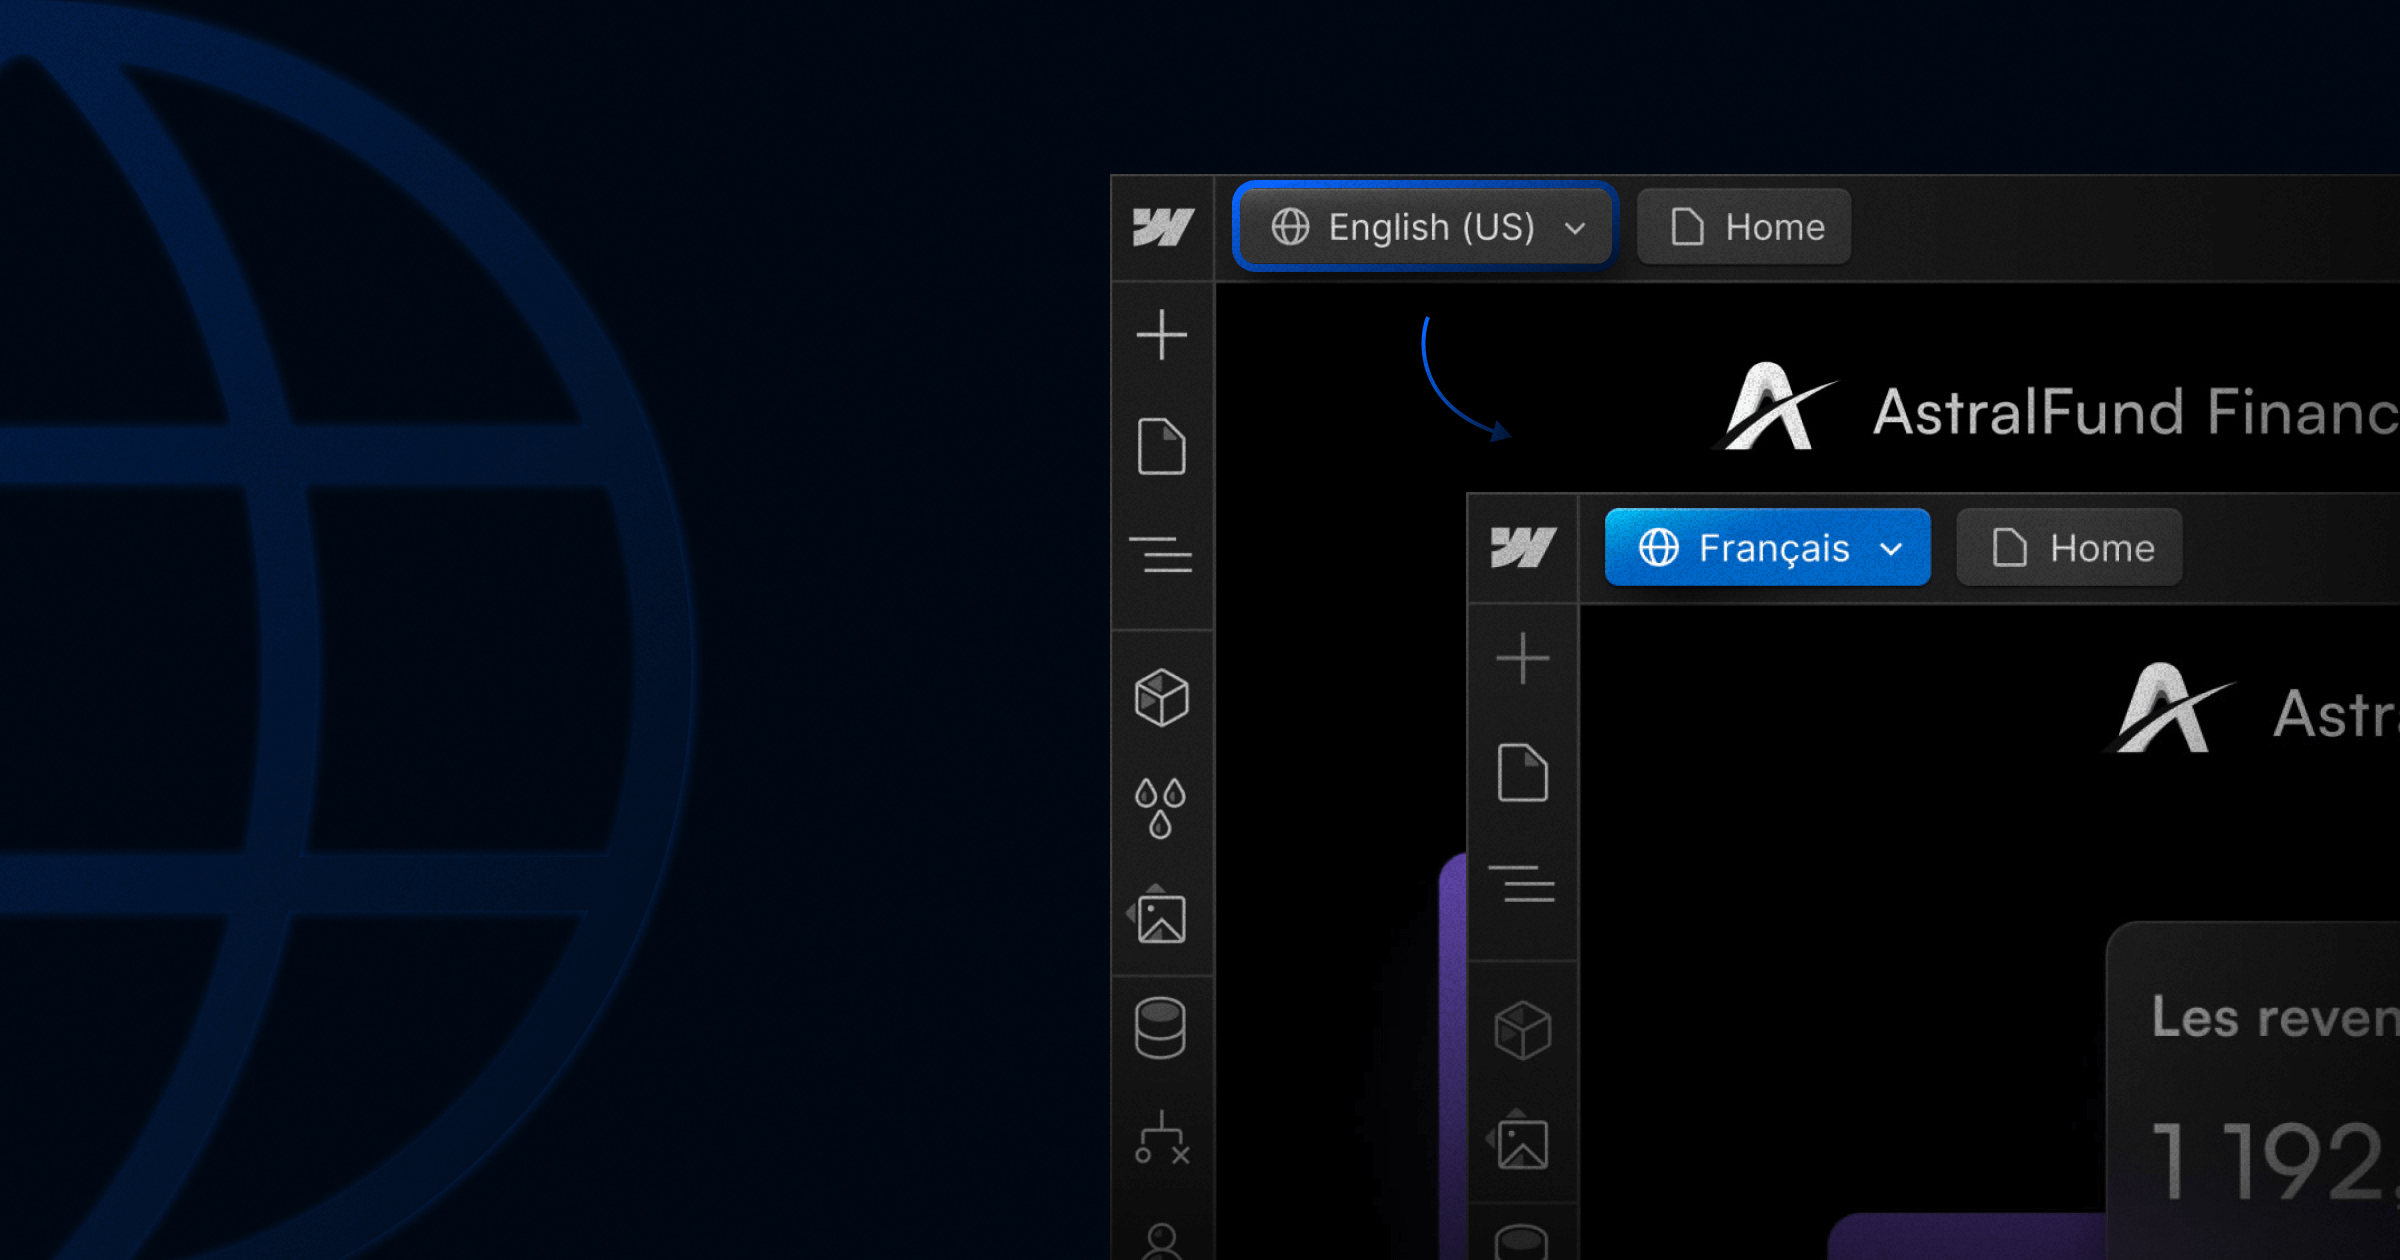
Webflow Localization works by enabling users to create and manage multiple versions of their website for different regions and languages directly within the Webflow platform.
They usually do it by adding the primary and secondary locale.
A "locale" in the context of web development and localization refers to a specific geographical, cultural, or linguistic market for which a website or digital content is tailored.
It usually encompasses a combination of language and regional settings, like language, date and time formats, currency, number formatting, and other cultural norms. For example, "en-US" represents the English language as used in the United States, while "fr-CA" represents French as used in Canada.
The localization process on Webflow typically involves:
- Adding locales — Users can add various locales to their site, each representing a different language or regional version.
- Design and content customization — In the Webflow Designer, users can design and build their site with localized content. They can customize static pages, CMS content, images, alt text, and styles for each locale.
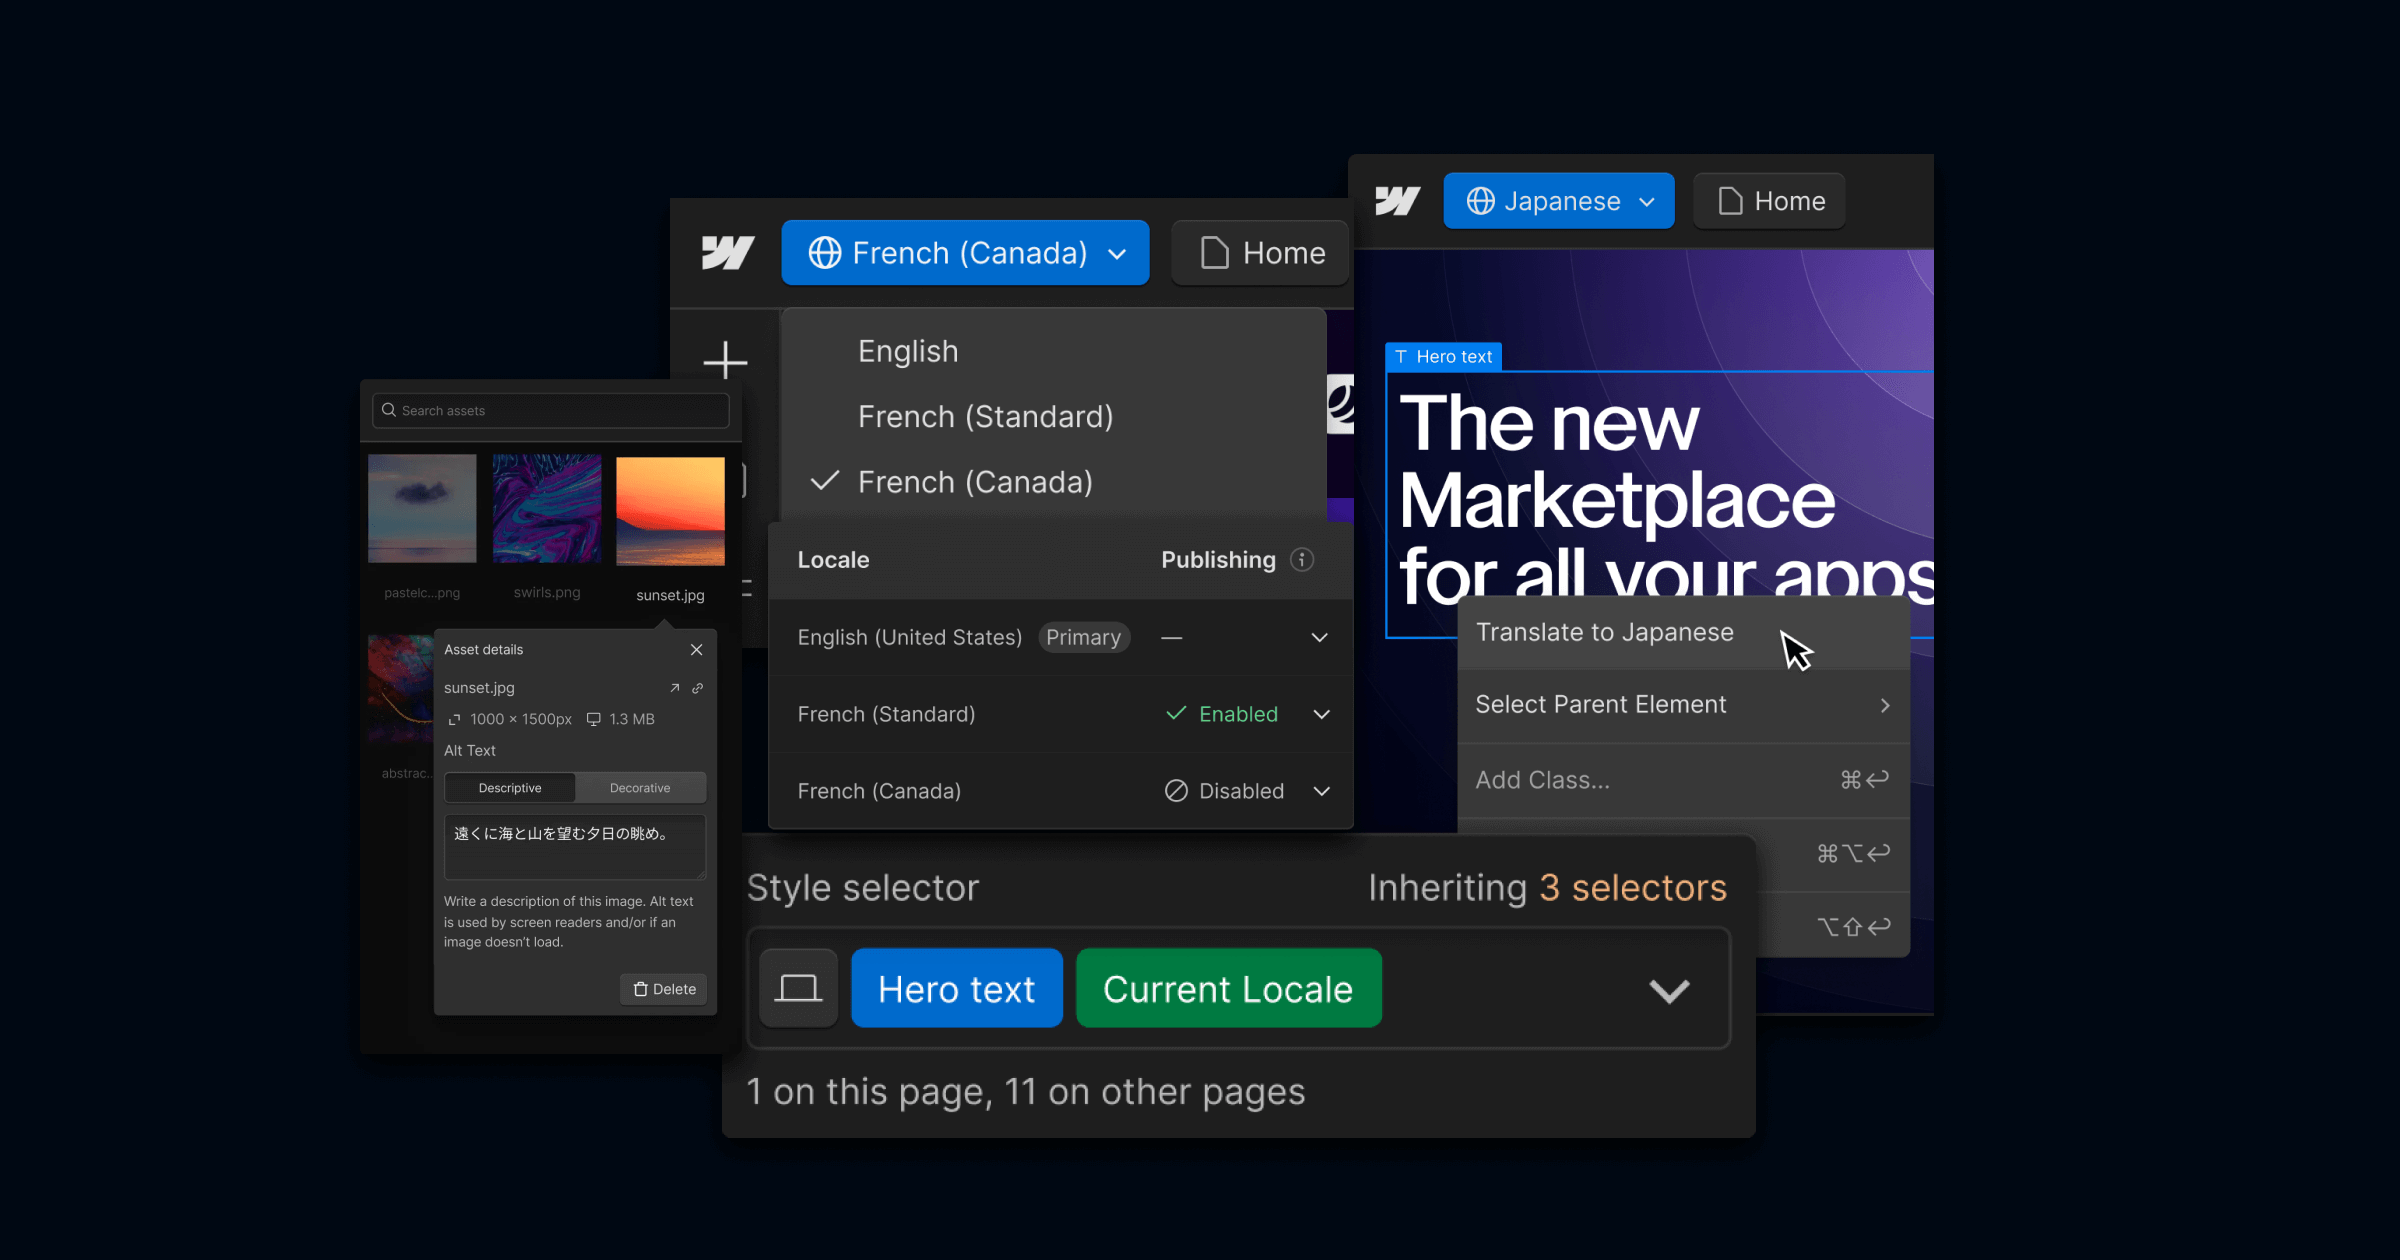
- Translation integration — Webflow allows for text translation either natively or through third-party translation tools. Users can start with machine-powered translation and then refine translations manually.
- SEO and traffic optimization — The platform includes features for localized SEO, such as customized URLs, metadata, and sitemaps with hreflang tags.
- User experience enhancements — Webflow provides tools to control element visibility and create customizable locale selectors for site visitors, allowing them to choose their preferred language or region.

Webflow Localization Key Features
The number of features and their limits mainly depend on the localization plan you decide to use. There are currently three pricing plans: Essential, Advanced, and Enterprise.
Essential plan costs $9 per locale a month and includes:
- Up to 3 locales
- Translation powered by machine
- CMS localization
- Static page localization
- Localized SEO
- Style localization
Advanced plan costs $29 per locale a month and features all of the above, plus:
- Up to 10 locales
- Asset localization
- Localized URLs
- Automatic visitor routing
The Enterprise plan doesn’t have a price disclosed, as it is to be discussed with the Webflow sales team. It features all of the above, in addition to:
- Custom locale number
- Draft locale specific static pages
- Customizable element visibility
- Enterprise scale
- Fully integrated with Webflow Enterprise
Primary Benefits of Webflow Localization
Here’s how localization can help you grow your website and, consequently, your business.
- Enhanced user experience — By tailoring content to different languages and cultural contexts, Webflow Localization improves user engagement and satisfaction.
- Expanded global reach — Localization enables businesses to reach and communicate effectively with international audiences, broadening their market presence.
- Improved SEO — Localized content and URLs can significantly enhance search engine optimization for different regions, leading to better visibility and traffic. Combined with a good Webflow SEO agency, you can achieve significant impact with local SEO.
- Streamlined process — Webflow's visual design tools and integration options make the localization process efficient and accessible, even for users without technical expertise.
- Cultural relevance — By localizing content, imagery, and design elements, businesses can ensure cultural relevance and sensitivity, which is crucial for building trust and brand loyalty in diverse markets.
How to Use Webflow Localization
Webflow did an excellent job of streamlining the process of localization. Here’s what you should do.
Add Locales to Your Project
To set up your locales, you need to go to Settings panel > Localization. The first one you’ll have to set up is the Primary locale, and you can later add other locales as well.
To set a locale, you need to determine three things:
- Display name — If you add a locale switcher to your website and it is visible to your visitors, they will see the display name for each locale that you set for them.
- Subdirectory — Subdirectory (locale slug) is automatically set following the internationally recognized country code. For instance, if you have a Serbian version of the site, the standard slug would be yoursite.com/sr/, but you can change it to yoursite.com/serbian/ or whatever else you wish,
- Publishing status — Webflow Localization gives you an option to publish something on the primary locale but not secondary ones. You can switch on or off whether you want something published in secondary locales.
Access Locales from Webflow Designer
Once you set up locales, you can access them from Webflow Designer. A new dropdown will be added to your top menu, where you can switch between the primary and secondary locales to edit them. All of the locales are available in design mode, edit mode, or preview mode.
Next? You need to actually start working on the essence:
- Localize content and styles
- Localize collections
- Localize page settings
{{cta}}
Content and Style Localization
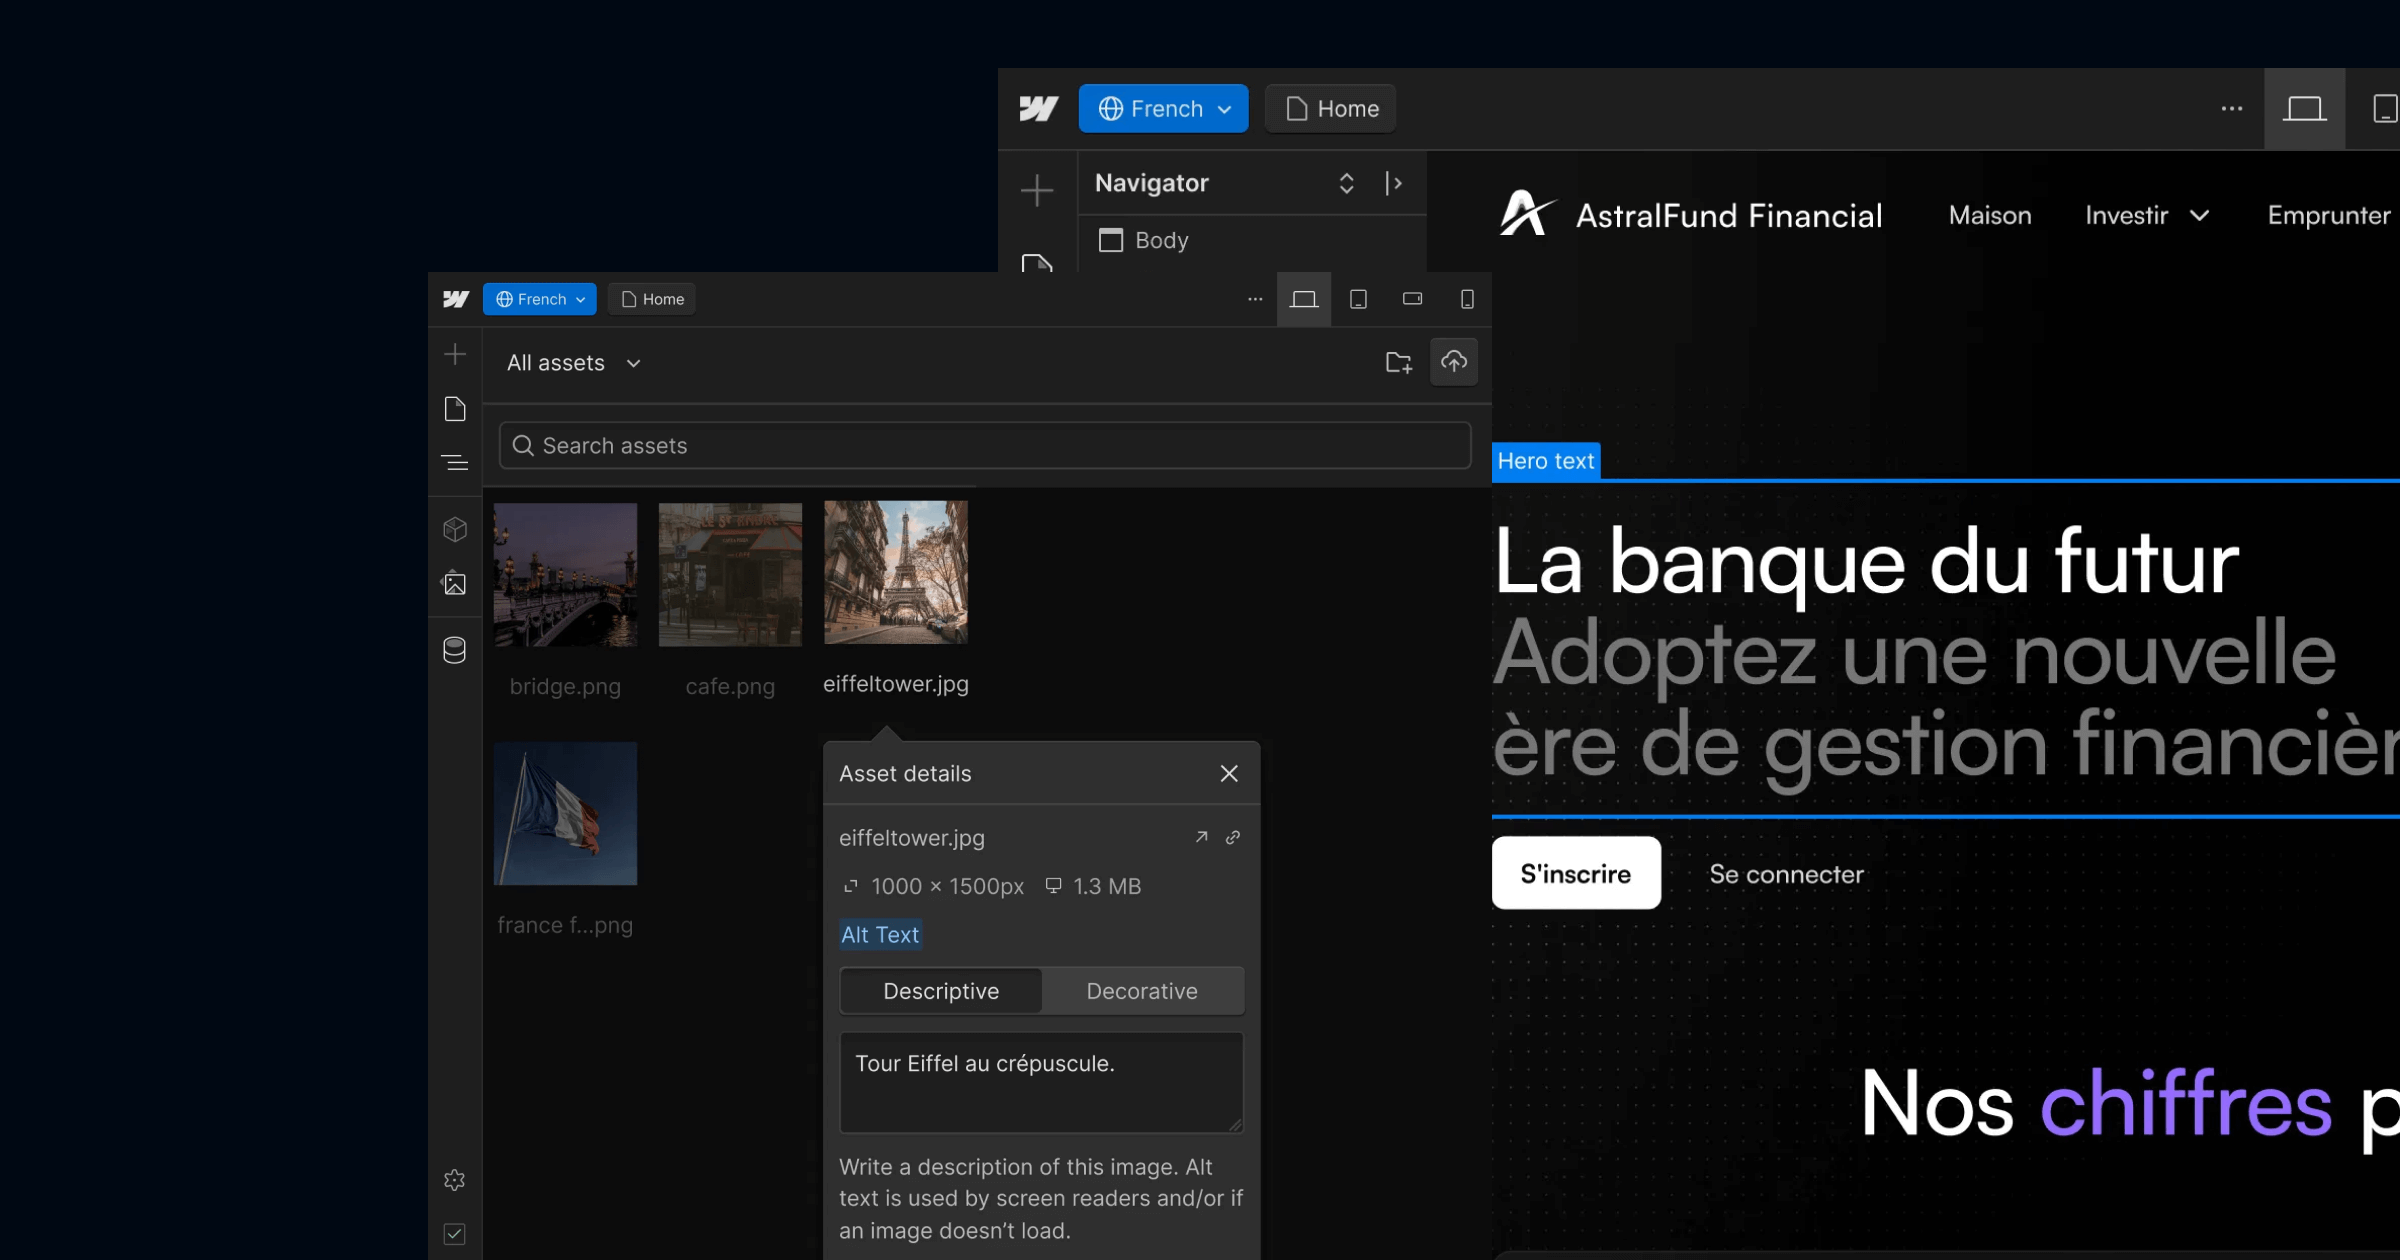
Once you select the secondary locale in Designer, it will look just like the primary one, but you can override it and change content that would only apply to the locale you’re editing at the moment. Here’s what you can edit.
- On-canvas text — Just click on the text and edit it as you want to adjust it to the locale. Alternatively, you can use Webflow’s translation option and let AI translate content for you.
- Assets — Assets may need to be localized because they contain text that needs to be adjusted, or you need a completely new asset for the specific locale. In that case, you just need to select the asset you want to replace and upload a different one instead of it. Don’t forget also to localize alt descriptions for assets. Webflow Localization also lets you keep the same asset but only change alt texts for them across locales.
- Styles — You can localize the styles on a locale for any element to adjust your site to the target audience.
- Components — To localize components on your site, select the desired locale from the Locale view dropdown, then double-click the main component on the canvas to edit it. This allows you to modify text and links in the main component, ensuring all instances within that locale reflect these changes. Alternatively, you can localize the default values of a component's properties by editing them in the Element settings panel under Component properties. For individual component instances, edit their properties directly in the selected locale, though these changes won't affect other instances, even within the same locale.
- Right-to-left text — Webflow automatically supports right-to-left texts such as Arabic when you localize such sites. But if you don’t want to be applied, you need to add dir="ltr" or dir="auto" as a custom attribute.
- Element visibility — You can customize the page presentation by altering element visibility for each locale. To do this, select the desired locale from the Locale view dropdown, navigate to Element settings, and then adjust the visibility setting of specific elements to either "show" or "hide". Notably, elements hidden in this way are removed server-side, meaning they won't appear in the site's design or its HTML markup, ensuring a clean and locale-specific presentation.
Collections Localization
When you create a Collection, its structure and fields are shared across all locales, regardless of the selected Locale view. However, individual CMS items within a Collection, such as blog posts or recipes, are unique to each locale, allowing for tailored content per locale. This means you can create specific items like an Event Collection item for one locale, like "Thanksgiving" for English-US, and exclude it from others, such as the English-UK locale.
Secondary locales inherit field values from the primary locale, but once customized in a secondary locale, they won't update with changes from the primary locale. To reset a Collection field to its primary locale value, select the field in the secondary locale and choose Reset. You can view, create, edit, or delete Collection items in any locale by selecting the desired locale from the Locale view dropdown.
To manage publishing statuses by locale, you can stage Collection items like blog posts for publication in one locale while keeping them as drafts in another. This is done by opening a Collection item and using the "launch arrow" icon to edit and manage its publish status for different locales.
For localizing Collection lists, Webflow automatically fetches Collection items for the current locale view in both the Designer and published site. A Collection list, like "Blog posts", will only show items from the selected locale. To display primary locale's Collection items in a secondary locale, adjust the settings in the Collection list to "Use primary locale."

Page Settings Localization
Webflow also supports localizing SEO, OG, and page settings, meaning they can be different on different locales.
To change SEO and Open Graph settings, select a locale, open the page panel, click on the cog icon to open the settings, and proceed with editing the settings. They would only be saved on the locale level.
You can also localize custom code, and the best approach to do so is via the HTML lang attribute, which can be used as a locale selector.
Final Thoughts
In conclusion, managing multi-locale websites in Webflow is a seamless and efficient process with the Localization feature. By utilizing Webflow's robust capabilities, you can easily create, localize, and manage content across various locales, ensuring that each version of your site is tailored to its respective audience. From customizing Collection items and their publishing statuses to adjusting page presentation through element visibility, Webflow offers an intuitive platform for building dynamic, region-specific websites.
For those looking to harness the full potential of these capabilities, consider partnering with Flow Ninja, a Webflow agency adept at crafting exceptional digital experiences. Our expertise in Webflow will guide you in maximizing the platform's features, including the localization feature for your multilingual website needs.
{{cta}}
Is Webflow localization free?
Webflow Localization isn’t free, but it offers a trial. Paid plans start at $9 per locale/month for the Essential plan. Advanced ($29 per locale/month) and Enterprise tiers unlock features like asset localization, automatic routing, and custom locale numbers. Free projects require upgrading to publish localized sites.
What is the difference between Webflow Localization and Weglot?
Webflow Localization is built into Webflow, allowing you to manage design, translation, SEO, and publishing all in one place. Weglot is an external integration that automates translation and syncs content dynamically. Weglot works across multiple platforms, while Webflow Localization is deeply tied to the Webflow Designer.
What is the best website translator?
The “best” depends on your needs. For Webflow users, Webflow Localization or Weglot are leading options. Outside of Webflow, tools like DeepL and Google Translate API offer high-quality machine translations. For maximum accuracy, most businesses combine machine translation with manual editing by native speakers.
How does Webflow Localization work?
Webflow Localization lets you create locales—language or region-specific versions of your site. You can customize CMS content, static pages, assets, styles, and SEO per locale. It also supports translation (machine or manual), localized URLs, hreflang tags, and visitor routing to deliver tailored content globally from within Webflow Designer.
Is Webflow suitable for multi-language global company sites?
Yes. With its Advanced and Enterprise localization tiers, Webflow can handle multi-language websites for global companies. Features like custom locales, localized SEO, right-to-left support, and enterprise-scale performance make it suitable. However, companies with complex translation workflows may still combine Webflow with professional translation management tools.
How to handle multi-language content in Webflow CMS?
In Webflow, CMS content inherits from the primary locale but can be customized per secondary locale. You can localize fields like titles, images, and metadata directly within the CMS. This allows you to manage multilingual blog posts, product catalogs, or collections while keeping everything in a single Webflow project.
Does Webflow support SEO for localized sites?
Yes. Webflow Localization includes localized SEO features, such as unique subdirectories, custom metadata, alt text, and hreflang tags for each locale. These help search engines identify and rank the correct language or region version of your site, improving visibility and traffic in different international markets.
Can I combine Webflow Localization with third-party tools?
Yes. While Webflow offers native localization, many teams integrate Weglot, Lokalise, or Phrase for advanced translation workflows. These tools sync with Webflow CMS content and provide professional translation management. Combining them ensures both design flexibility in Webflow and smoother translation handling for larger, multi-language websites.

Mihajlo Ivanovic
Mihajlo is the one who replaces Lorem Ipsum texts with the actual copy - an SEO and content expert at Flow Ninja. He has 10+ years of experience as a content writer for various industries. He also plays bass occasionally.
.png)
-5.png)
-min.png)
-min.png)


.svg)

.png)
.png)
.webp)
.svg)

